"Appointments" in Eziplan are at the core of several functions within the software system. These functions include rostering, invoicing, payroll, budgeting, statements and many more.
There are two types of appointments within Eziplan; Single and Repeat.
Repeat appointments is to help setting up reoccurring appointments as the system will continue generating individual appointments from Repeat appointment.
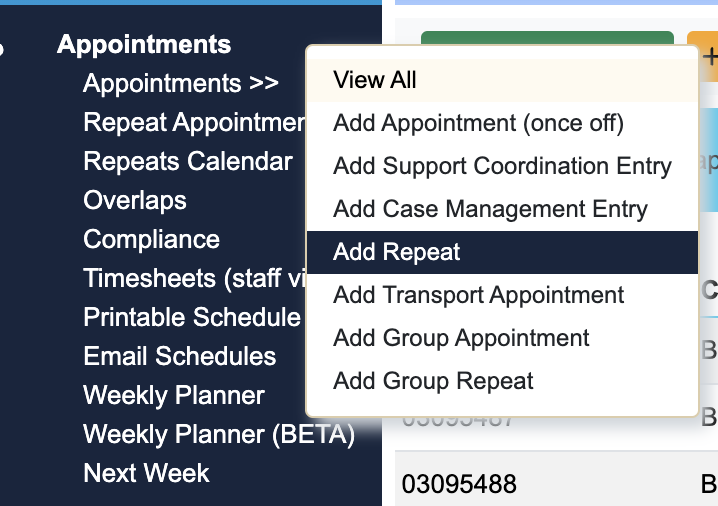
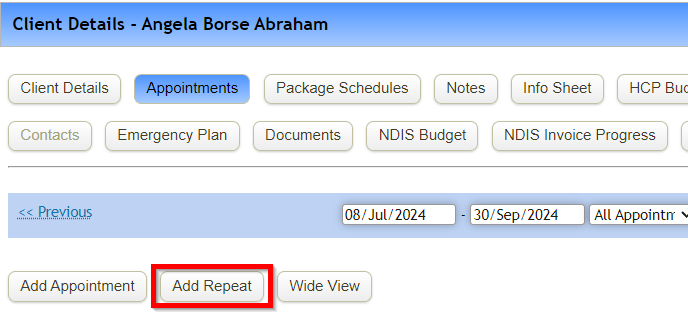
Navigating to Add a Repeat Appointment
Mandatory Fields
Optional Fields
Feature Specific Fields
Errors and Warnings
Navigating to Add a Repeat Appointment
* Quick Access Menu
* Appointments Table
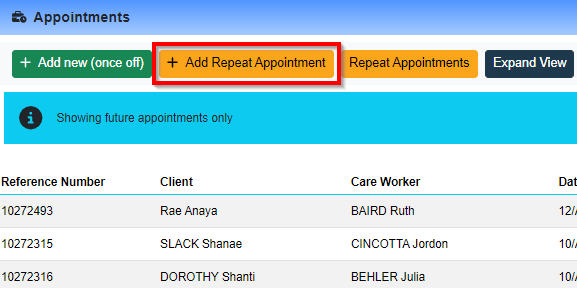
* Repeat Appointment Table

* Client Appointments
Mandatory Fields
The following fields are required for a Single Appointment to be added into the system. Below is a breakdown of each field:
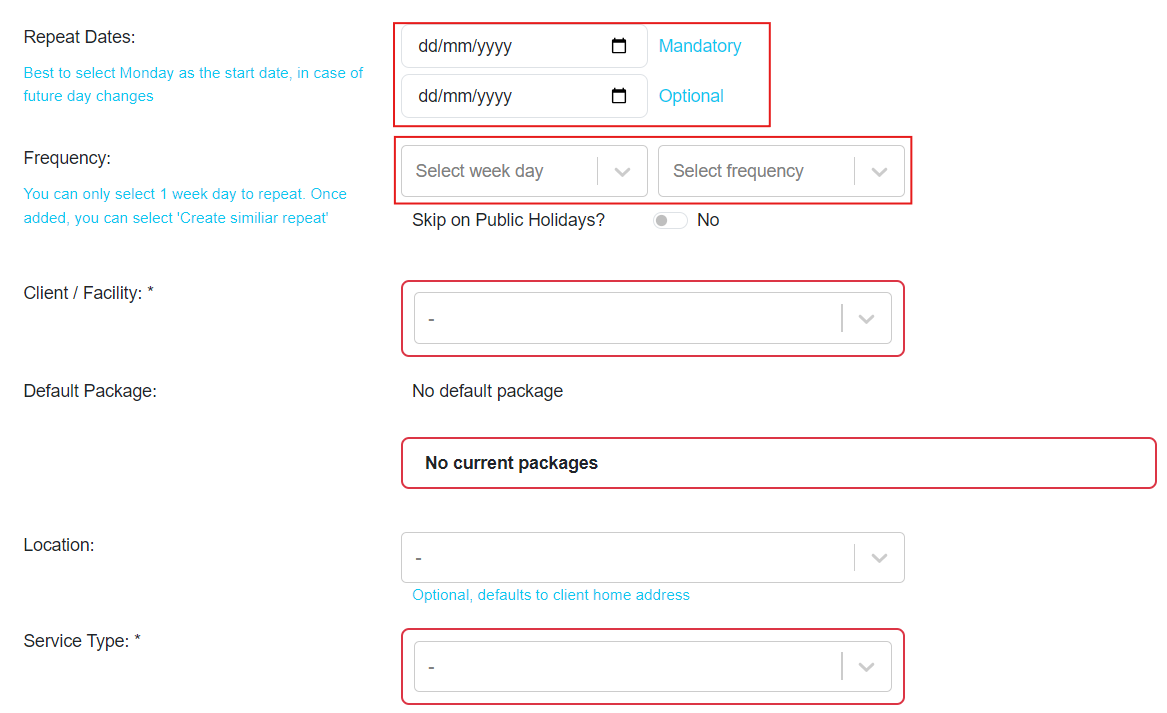
Repeat Dates & Frequency
Located at the top of the page, these fields are to set 1) how long this repeat appointments will continue, and 2) how often it will occur:
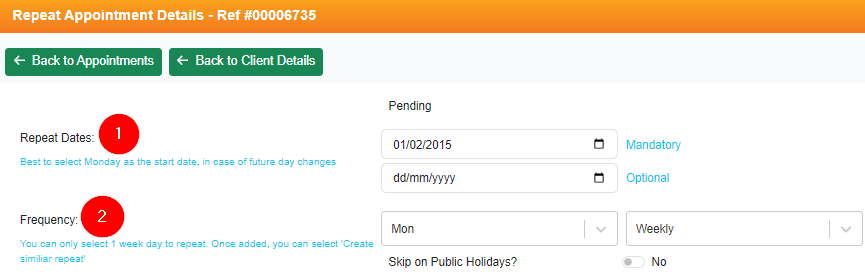
1. Repeat Dates
Start Date: We recommend to set this start date as Monday of the starting week. This way, there won't be any case where current week's appointment gets missed. (e.g. If Start date is set to Friday, the 9th, but it is for every Thursday appointment, the system will not be generating for 8th)
End Date is NOT mandatory and can be left blank
2. Frequency
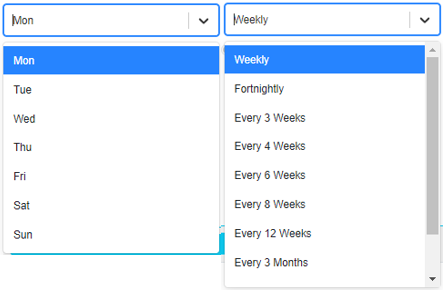
Select one of the week days from drop down, and frequency as well. You can only select one option, so if you need to create sets of repeat (e.g. Personal care appointments for every Mon and Wed), create one first and use Create Similar Repeat button located at the top of the repeat appointment.
Client/Facility
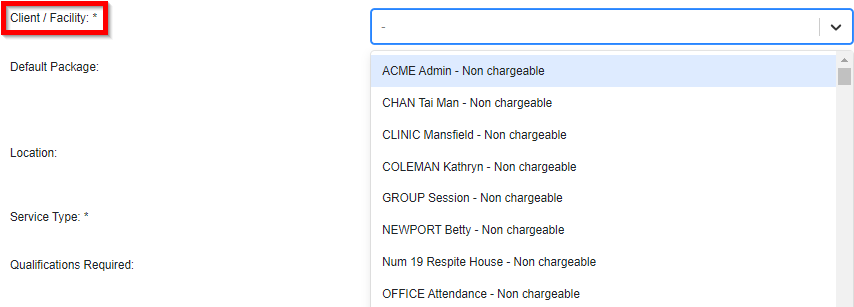
When clicking on drop-down next to client, the system will display whole list of your clients. Select the client you are creating repeat appointment for, that is, the client that is going to receive the service.
Once the client is selected, few additional information will appear:
1. Default Package - this data is pulled from client's page > default package
2. List of active packages available for this client (see details below under "Package Selection")
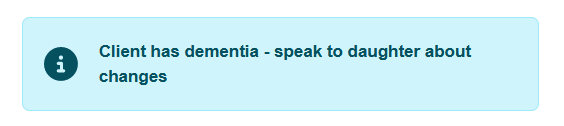
3. Admin Notes - this is also captured through client's page > admin notes. Any information admin/rostering team should be aware while adding appointments.
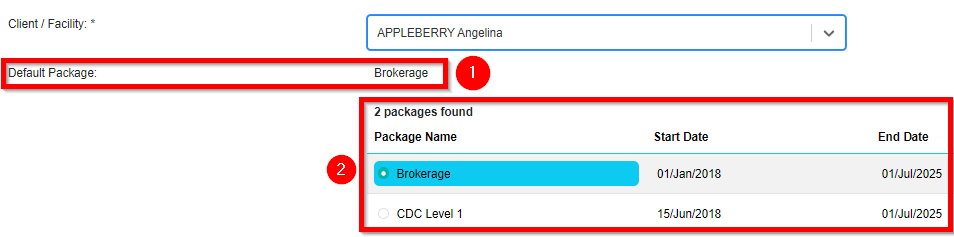
Package Selection
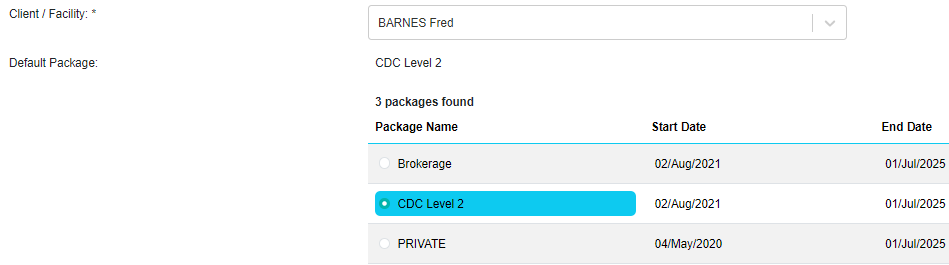
Upon selecting a client, a table showing a Client's active Package Schedules within Eziplan will be brought up. A selection will need to be made to ensure the correct billing processes occur.
If no package schedules are available, a warning will show up prompting the user to add one in the clients profile before continuing.

To see more about how to add a Client's Package Schedule see our guide HERE.
Service Type
A service type is required to be selected for both rostering purposes and invoicing/payroll outputs. Upon clicking dropdown, you can either search for service type from the list, or type on your keyboard to search within the Service Types.
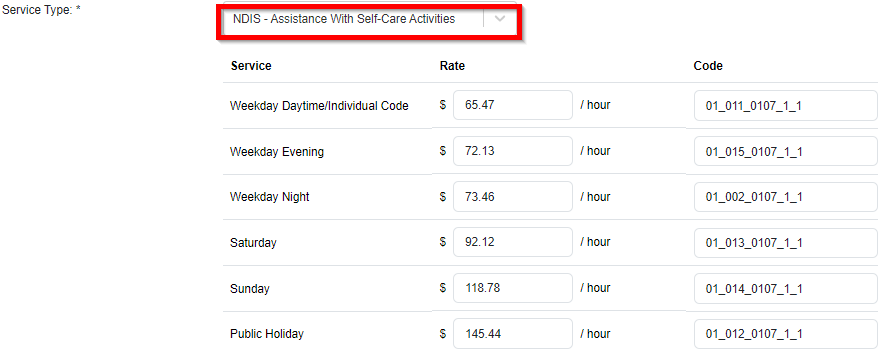
If an NDIS Service Type is selected, a new table will show up giving a breakdown of Rates and Codes to be attached to the appointment. This can be hidden on request to our support team.
Start/End Times
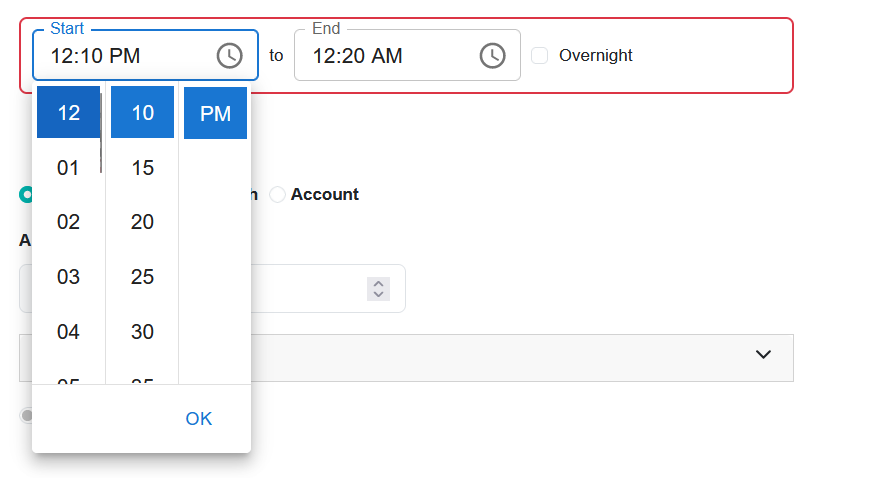
Start and End times are needed within an appointment for them to function properly. Eziplan 2 has introduced a new time selector that will make it easier when selecting times. Depending on your company's set-up, these time increments will show as either 5min or 15min time hops.

You can also schedule appointments to span midnight by selecting the Overnight Tick Box.
Once a time has been selected, Eziplan will auto-calculate the number of minutes the appointment is set for.

Optional Fields
The following list of fields is optional to enter when setting up an appointment - these fields may be entered at a later date or not utilised at all.
Qualifications Required
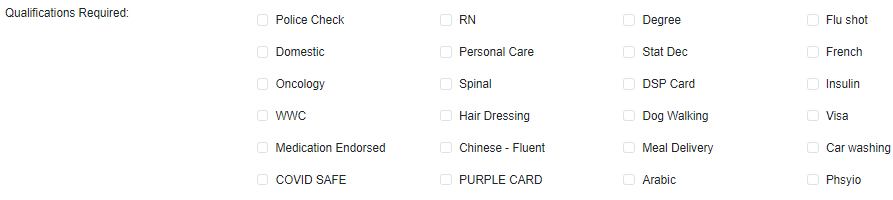
Qualifications can be utilised as a rostering tool to find appropriate workers. Qualifications can be pre-defined through service type (click HERE to see how to add to specific Service Types) or can be selected when generating appointment. This might be useful if you need a language requirement for a specific client.
The Qualifications work off an ALL approach, meaning that if a worker only meets some of the criteria, a warning will show when selected. (See details below under "Warnings") This warning message can be ignored.
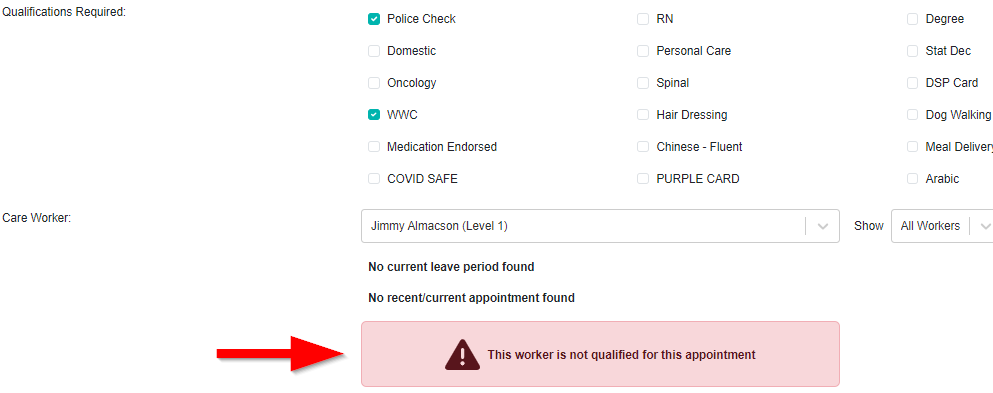
Care Worker
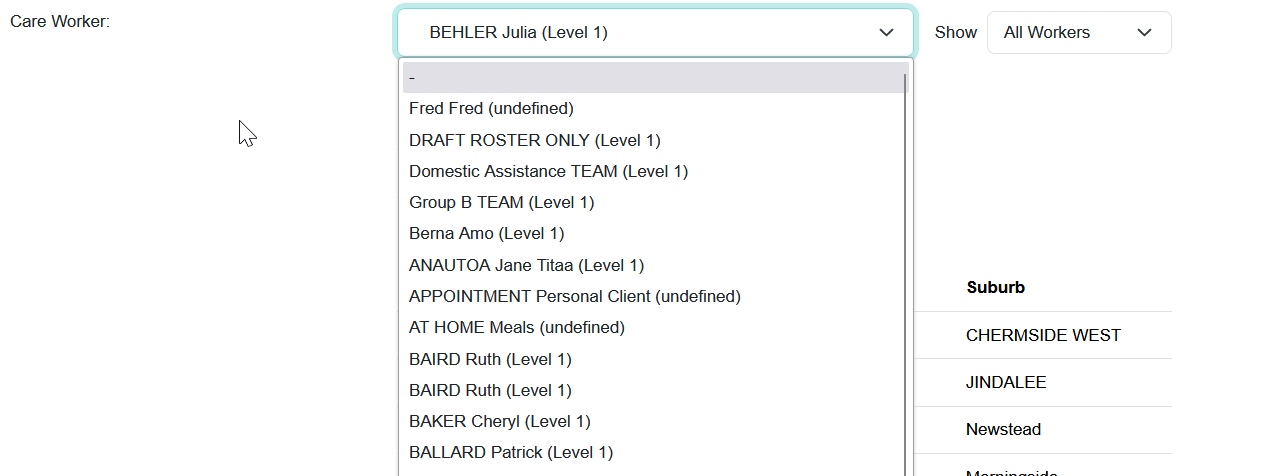
Selecting a Care Worker/Team Member when creating an appointment is optional, and may be filled out in a later process through Weekly Planner, or at a later date.
If you want to allocate it to care worker at this stage, you can simply use the dropdown list, and type in a name to select a worker.
When a worker is selected a number of additional fields will be shown to provide further context about the worker.
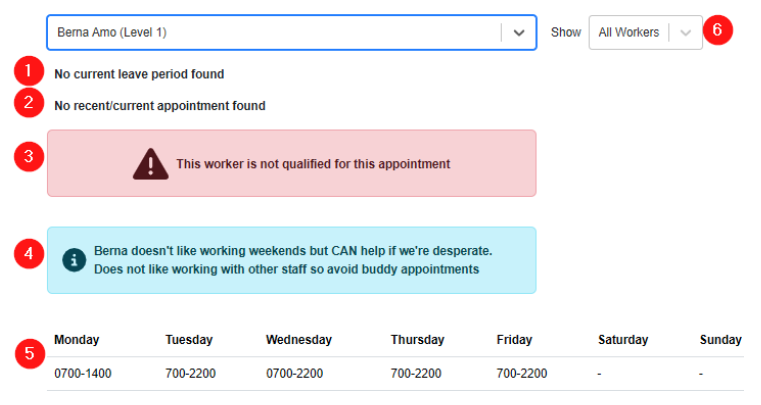
1. Leave Periods

Any upcoming leave that has already been added to the system will be shown here. To read more about leave management within Eziplan click HERE.
2. Existing Appointments
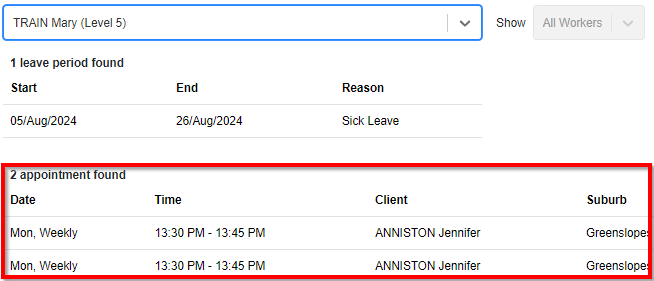
Existing repeat appointments near the selected appointment date will show up here to avoid accidentally double-booking a worker.
3. Alert for qualification conflict
Where applicable (if care worker without required qualification is selected), the alert message will come up.
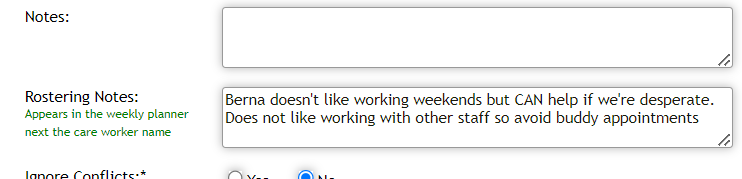
4. Admin Note
If care worker has Rostering notes added through their page, this note will also appear for rostering team to take into consideration.
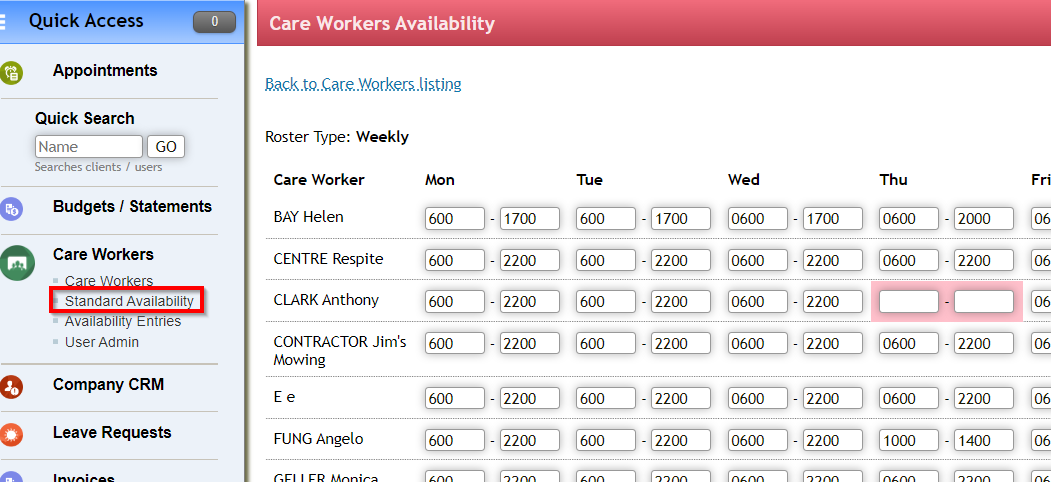
5. Standard Availability
A worker's standard availability is shown to make sure you are rostering an appointment within their scheduled available hours.
To see and modify a worker's standard availability you can read more HERE.
6. Filter for care worker
You also have access to some filters to make your selection a bit easier:
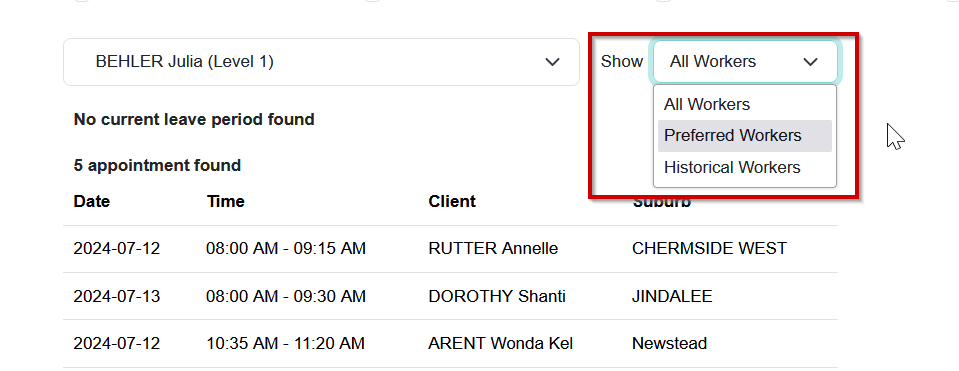
Preferred Workers:
This will filter the drop-down list to only show you the preferred workers of your client - see article HERE for adding in client preferences. In the event that there is a mismatch between worker and client preferences, a warning will show - see here for more warning details.
Historical Workers:
This will filter the drop-down list to only show you the active workers who have seen the client in the past 3 months.
Accounts
These settings should avoid being modified unless for specific reasons as they can drastically affect invoicing and payroll functions leading to inaccurate results.
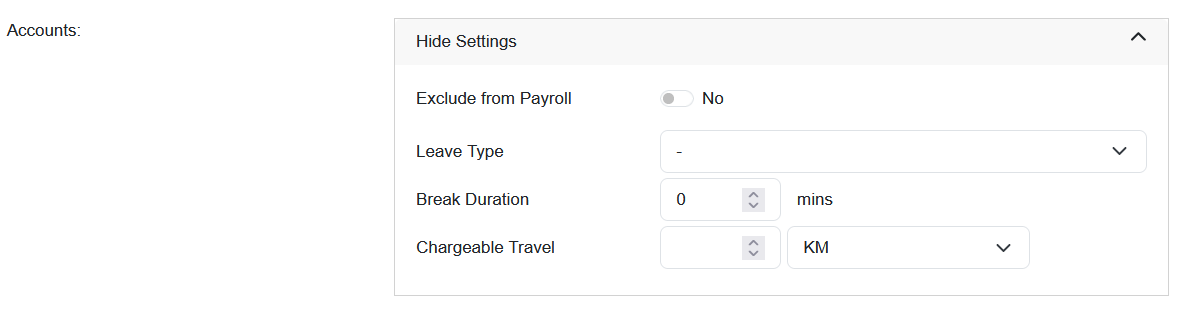
Eziplan gives access to modify appointments for accounts-related records such as invoicing and payroll. They can be accessed by clicking on the Show Settings Bar next to the Accounts heading.
Exclude from Payroll
If a single appointment needs to be excluded from payroll exports you can use this toggle to have the payroll export function ignore this appointment.
If a service type in general needs to always be excluded you should use the service type settings to achieve this instead - see HERE for details.
Leave Type
This setting can set an appointment as a leave entry instead of a normal appointment. This function shouldn't be actioned using this screen, however you can edit existing leave entries from here.
Break Duration
If you have organised one block shift and need to deduct a break (i.e. 8hr shift needs a 30min lunch break) you can set up the appointment to deduct 30mins automatically. This deduction is taken off at the end of the day (i.e. reducing the end time of an appointment).
Chargeable Travel
If you a pre-organised or pre-approved travel charge for the client you can enter in the value here based off KM's, Mins or Amount. On the invoice export, Eziplan will ignore the values entered by the worker/system and use the values listed here instead.
Flexible with Time

This is a simple setting that shows a visible queue on the weekly planner on whether an appointment is flexible or not. This can be helpful for identifying which clients appointments may be easier to move around if a change is needed on a particular day. The setting does not block changes.
Tasks/Medication/Equipment
Tasks
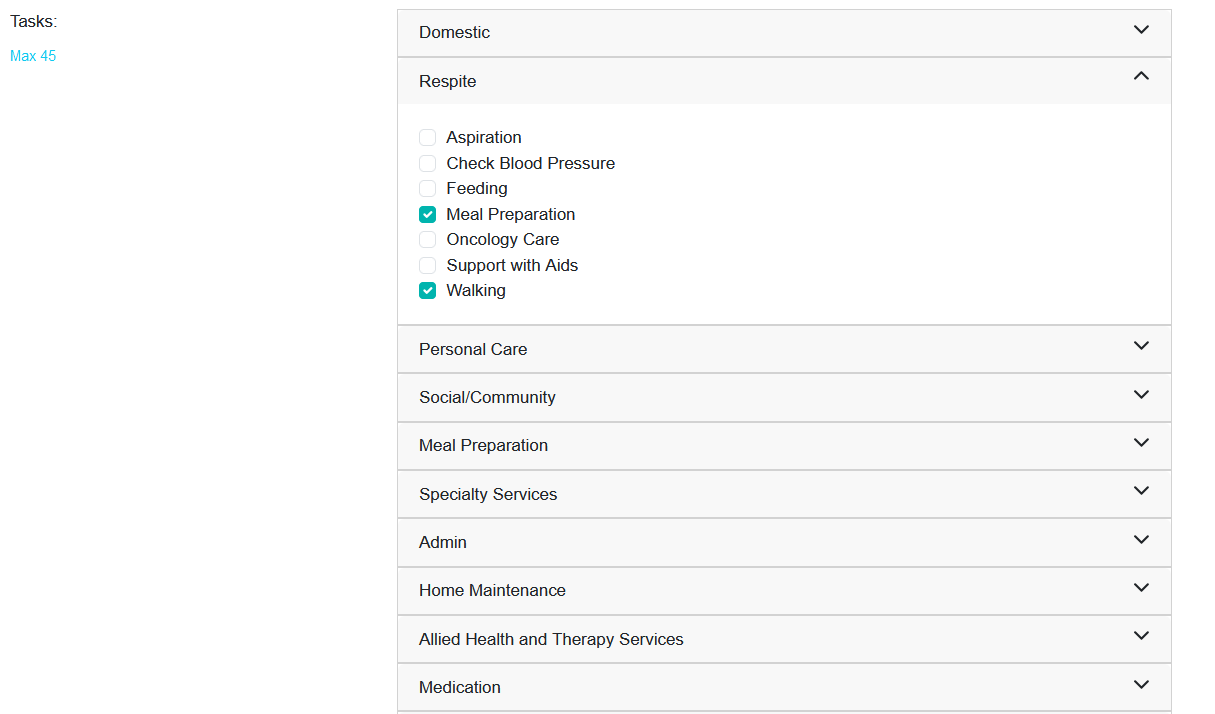
You can set up task types within Eziplan (see article HERE) and then attach these to your appointments which will in turn show up as checklist items on your worker's timesheets. These Tasks can also be made mandatory for your workers to tick before they can complete their timesheet. If you wish to make tasks mandatory simply reach out to our customer support team.
Medication
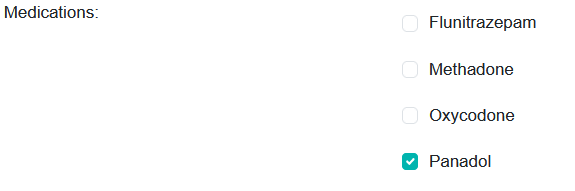
Eziplan has a feature that allows you to select what Medication is allowed to be delivered to the client as part of an appointment. This is an optional feature which may not be enabled on your version of Eziplan. Please speak with our Support Team if you wish this to be enabled.
Equipment
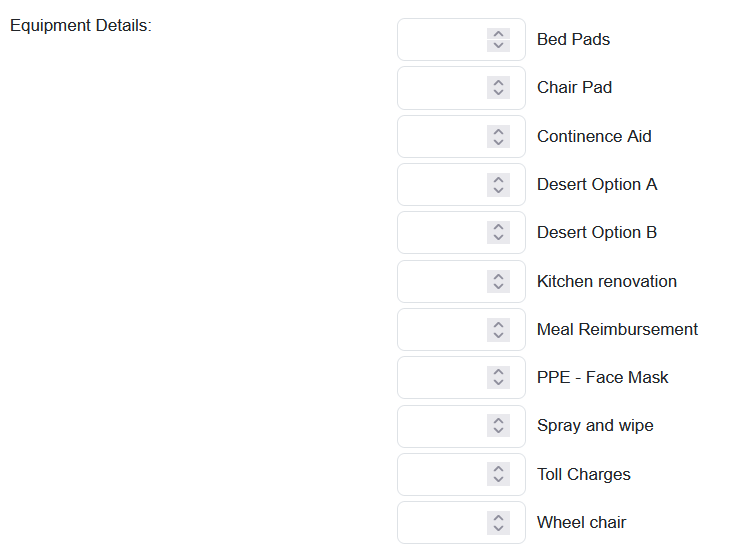
Eziplan has an equipment dispensation feature which allows Workers to log when they give a client a piece of equipment. This is an optional feature which may not be enabled for your business.
Please speak with our Support Team if you wish this to be enabled.
Notes

Sometimes you may need to provide additional information to your workers other than those already provided on the other settings. The Notes section allows you space for free text notes that will in turn show up on your workers timesheets in addition to Client Notes already attached to the client profile.
Feature Specific Fields
The following fields are optional feature-specific fields that have been enabled for some providers. If you are interested in learning more about the functionality of these fields or wish to have them enabled reach out to our Customer Success Team.
Locations
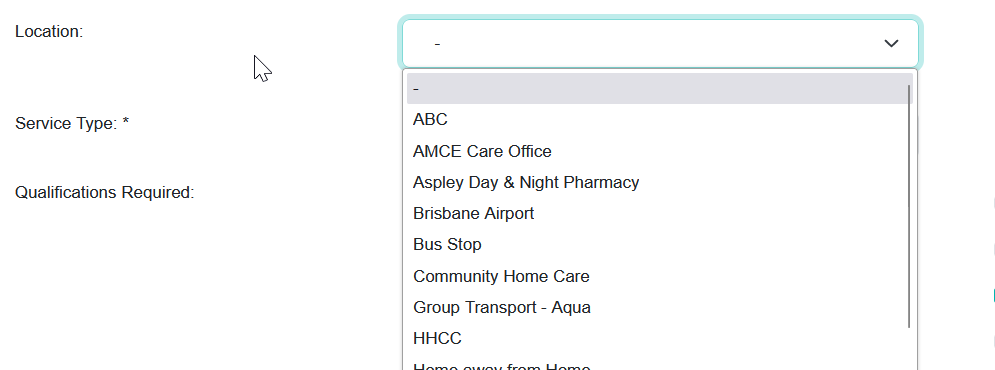
By default, this location is the client's address. However, providers can enable a locations feature which allows for a user to specify a different address for the appointment than the client's home address.
This feature can be useful in an example where you might need to pick up a client from the doctor's or if you are delivering a service to the client at a community centre/pool etc.
To add in additional locations, please contact Support team.
Trip Points
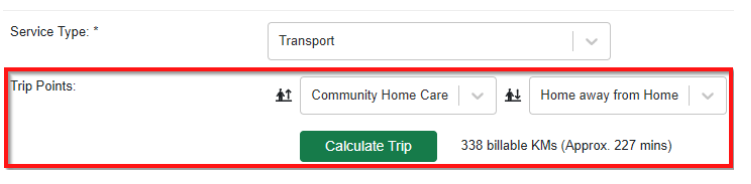
Providers can enable a Trip Planning feature for specific Service Types such as Transport Services. When these Service Types are selected, a new menu will show up where you can select different locations including the client's home address to:
Direct the worker to a specific pickup
Direct the worker to a specific dropoff
Pre-plan KM WITH the client to come out at invoicing/payroll
Payment Type/Collected
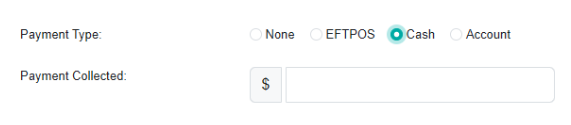
Typically used by Providers delivering CHSP services. Eziplan can enable a field for recording when payments have been collected at the time of service. This field can also be enabled on the Workers Timesheet to act as a receipt book.
Errors and Warnings
When adding an appointment there may be some errors that prevent you from saving an appointment or some warnings that show up as a double confirmation before allowing you to save.
Errors
Errors occur when you have tried to add an appointment that does not contain all of the mandatory fields or with data that is not correct.
Where there is an error - red boxes will display around the fields that are missing or incomplete

Eziplan will also warn you where the start time is after the end time selected.
Warnings
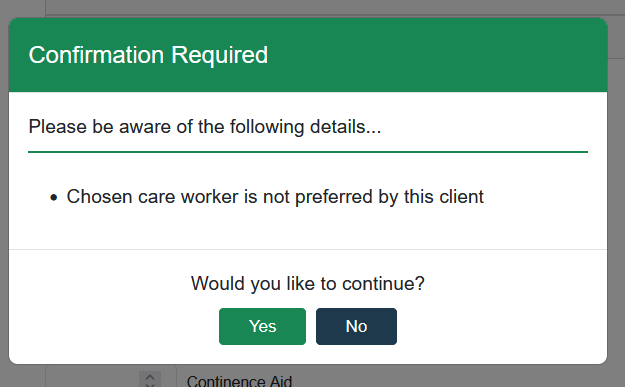
Warnings will be displayed when you have previously ignored mismatching details but are not considered a full error. These warnings might include mismatches of client/worker preferences as well as double booking of times.